

How To Get To Deleted Photos Iphone

Our iPhones are the primary device that most of us take our photos on. They live in our pockets and the camera quality over the years has improved so much to the point that it is the only camera that we need to carry. The days of needing to bring along another device to take pictures are pretty much a thing of the past.
We take pictures of our friends, places that we have been to, and have some of the most important moments of our lives on our iPhone. With so many important moments being captured, when one isn't there it can be catastrophic.
Luckily, there are many ways to retrieve deleted photos on iPhone and get them back. In this article, we're going to look at how to recover accidentally deleted photos on iPhone.
Where Do Deleted Photos Go on iPhone
Even though there's no central Trash folder on iOS like there is on macOS, photos don't immediately disappear when you delete them. Instead, they are moved to the Recently Deleted album in the Albums section of the Photos app.
The Recently Deleted album is basically an app-specific Trash folder that can save the day when you make a mistake and accidentally delete an important photo that you definitely don't want to lose.
The benefits of the Recently Deleted folder are that:
- it is super easy to access and use,
- it takes almost no time at all to undelete photos on iPhone,
- we can restore photos on iPhone.
Think of it as a safety net that is put into place in case we delete something and then change our mind about it.
Because of how the Recently Deleted album works, it may not include all photos and other image files. Many third-party apps store image files in different locations, and they don't always handle image deletion the same way.
Method 1: Recover Deleted Photos from iPhone using the Recently Deleted Folder
Photos missing from iPhone can be restored from the Recently Deleted folder, and it only takes a few steps to do so:
Step 1. Open the Photos app on your iPhone.
Step 2. Tap on Albums and then scroll down until you see Recently Deleted, it should be right at the bottom of the list.
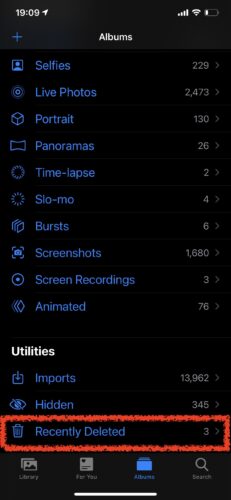
Step 3. From here, click on Select which will be in the upper right-hand corner of your screen, and tap on the recently deleted photos that you would like to recover. If you want to recover all of them, you can click on Recover All. You also have the option to delete all from within this screen.

Step 4. Click on Recover to retrieve deleted photos on iPhone and then they will be put back into the All Photos view.

Photos and videos will show the days remaining before deletion from within the Recently Deleted folder. After the time has expired, they will then be permanently deleted from your device. It may take up to 40 days for this process to complete so you have some time if you delete a photo and then realize that you want to restore it. This is the easiest way to view deleted photos on iPhone and recover them.
Method 2: Recover Deleted Photos using Data Recovery Software
If your lost photos can't be retrieved using the above methods, then it's time to use data recovery software to retrieve the deleted photos.
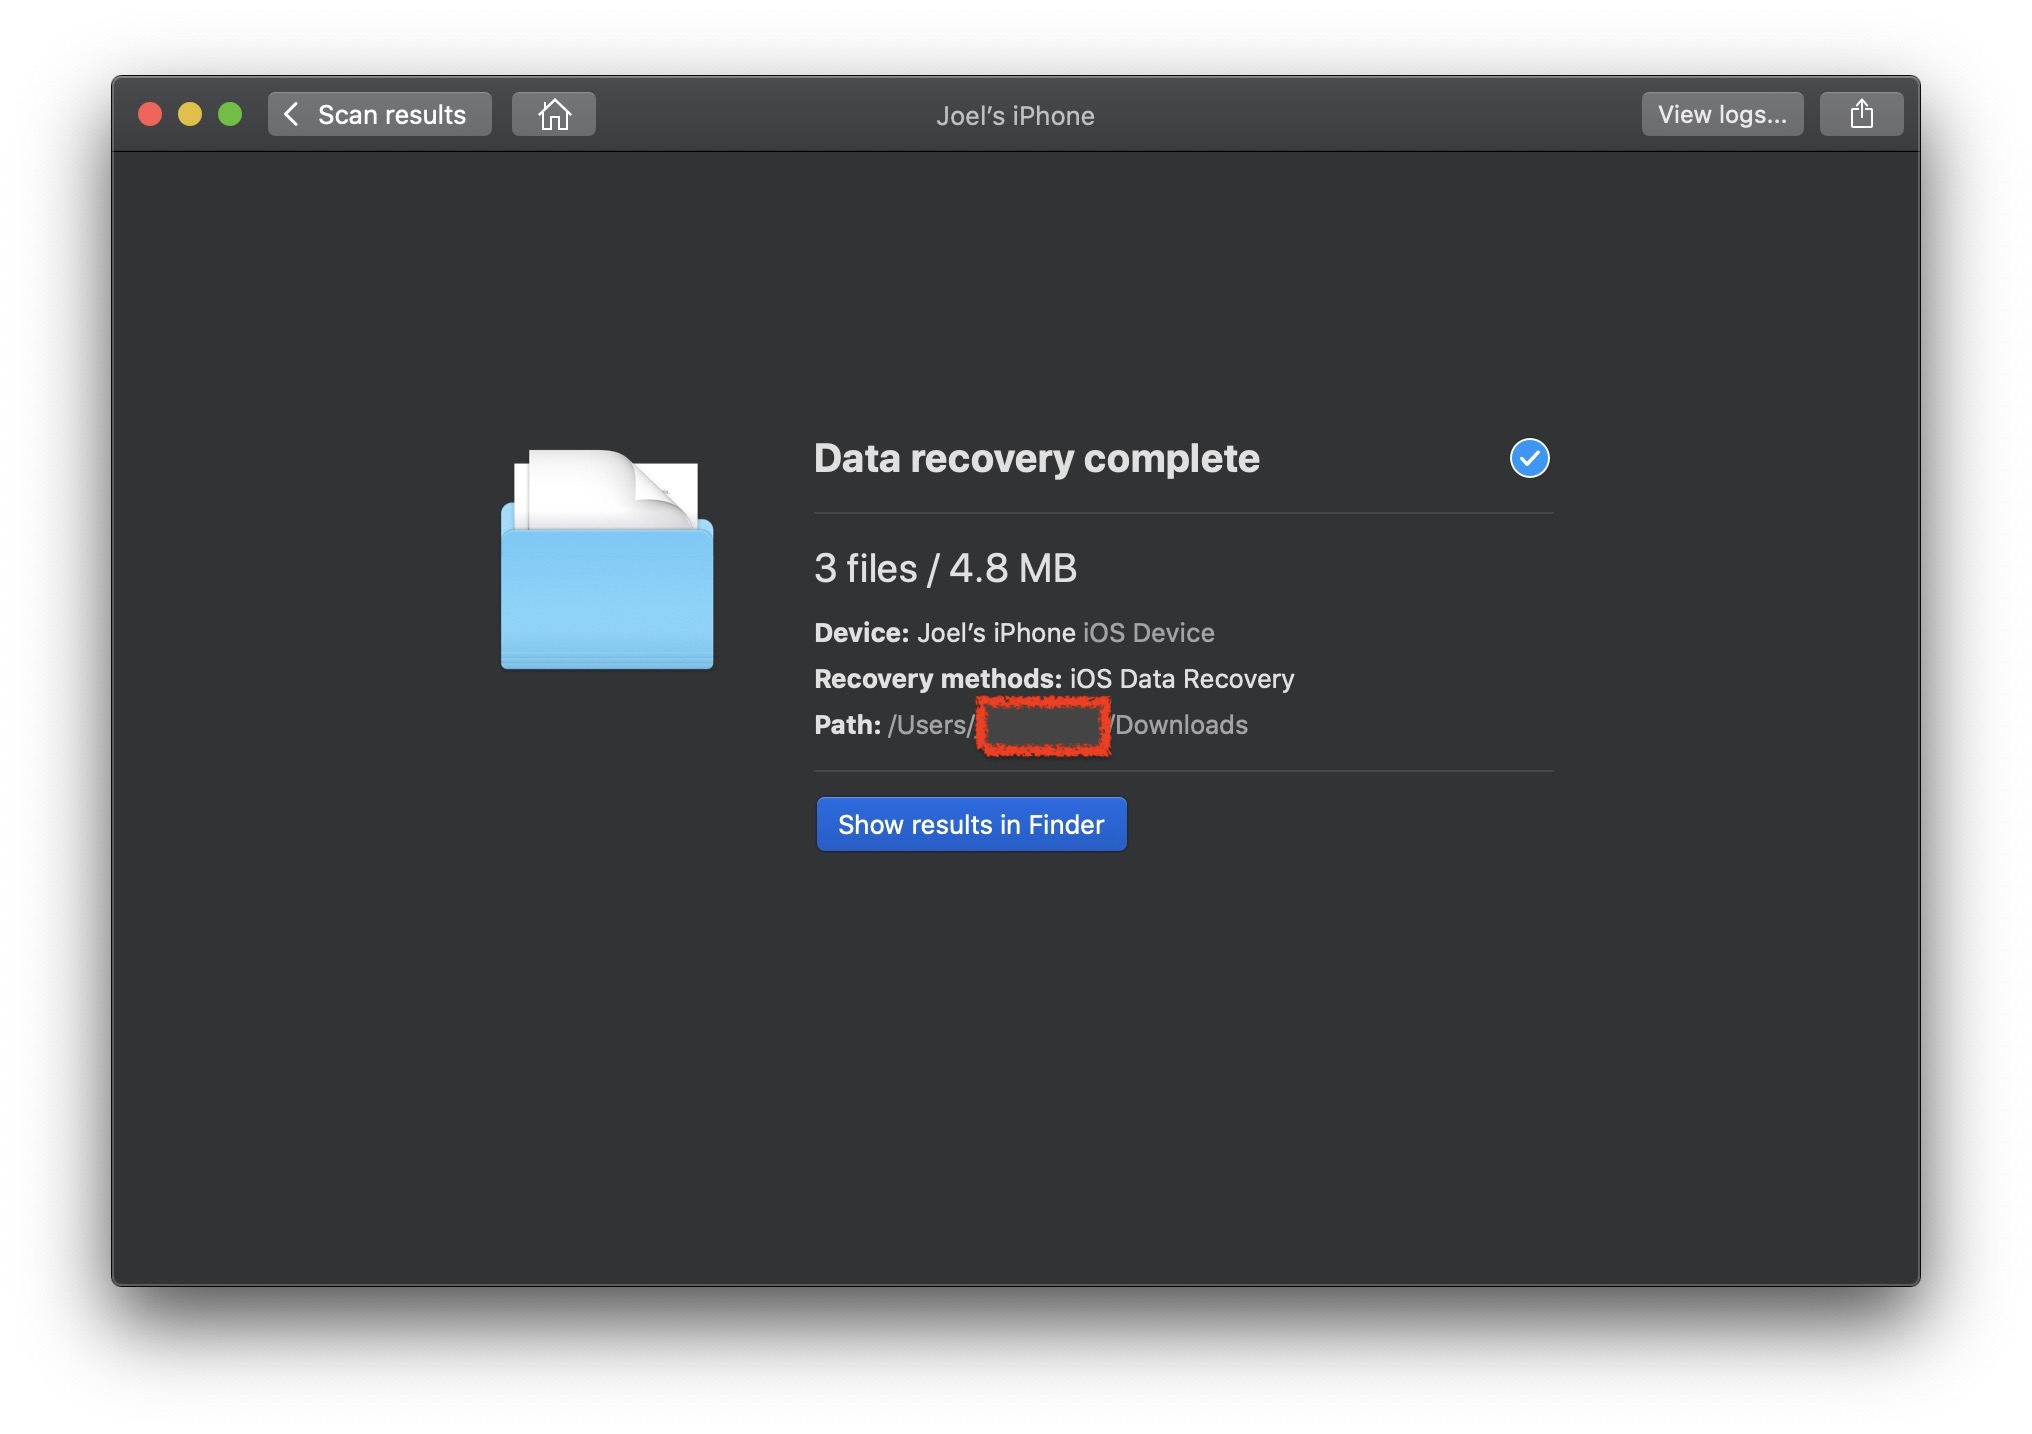
Disk Drill is an iPhone photo recovery software program that allows us to recover permanently deleted pictures after they have been deleted from the Recently Deleted folder or aren't recoverable from a backup. They are still there, but just not visible to you. Disk Drill can be downloaded on either Mac or Windows and will allow us to recover old photos on iPhone.
Step 1. Download and install Disk Drill for your computer.
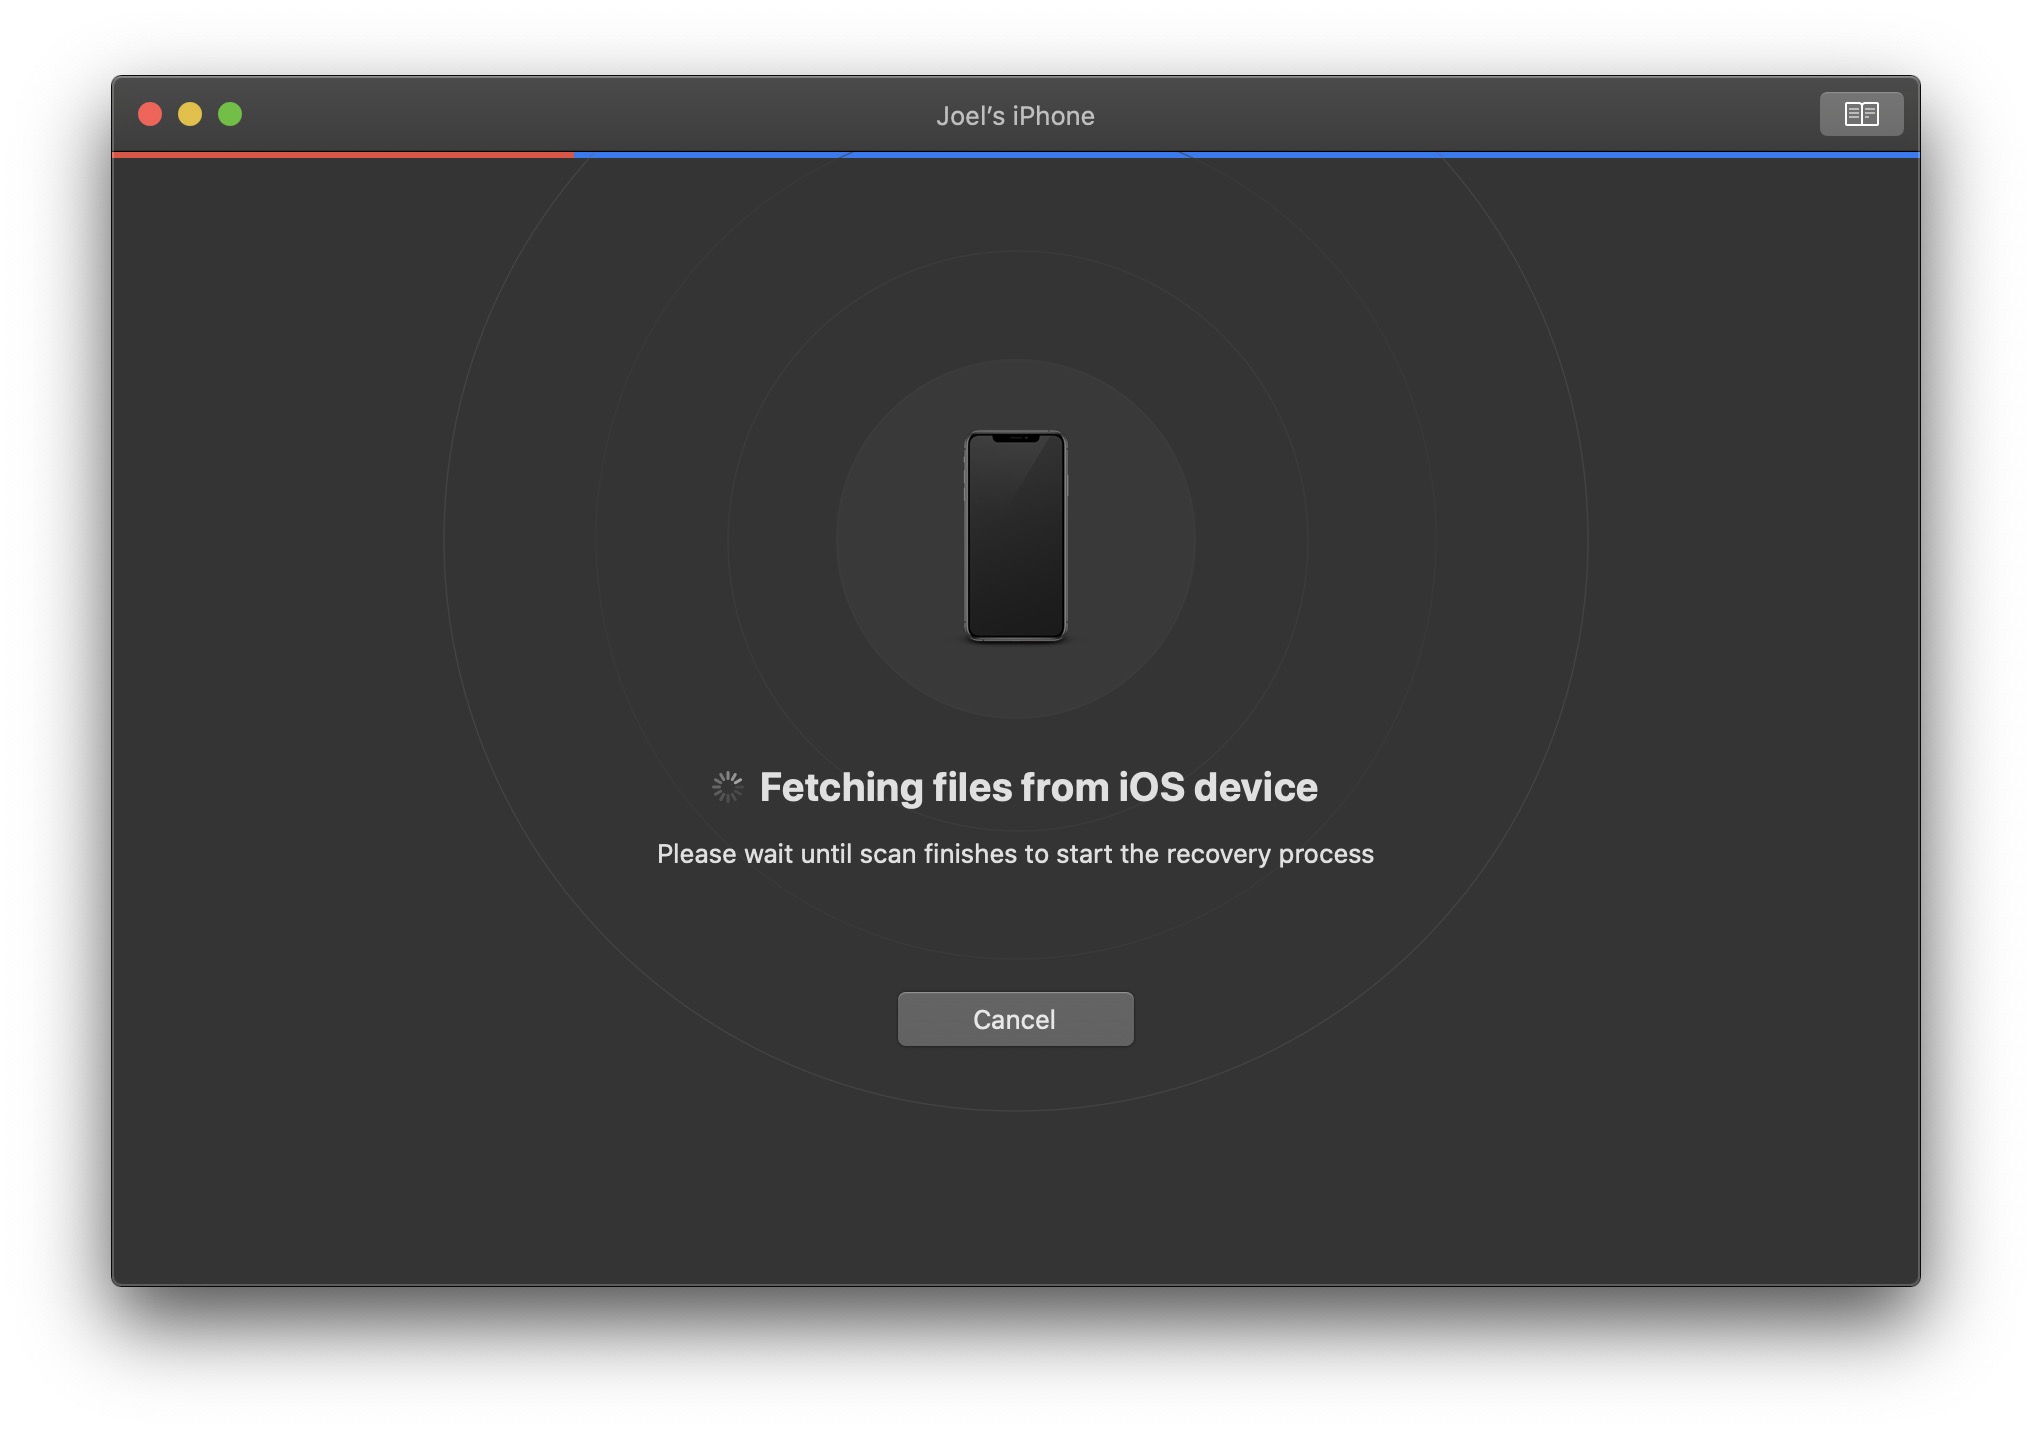
Step 2. Initiate a scan by plugging your iPhone into your computer and selecting it as the device to search through.

Step 3. Wait for the scanning process to complete. This shouldn't take long but will vary depending on how much data you have on your iPhone. For my phone, it took around 20 minutes to complete and I have a lot of things stored on my device.
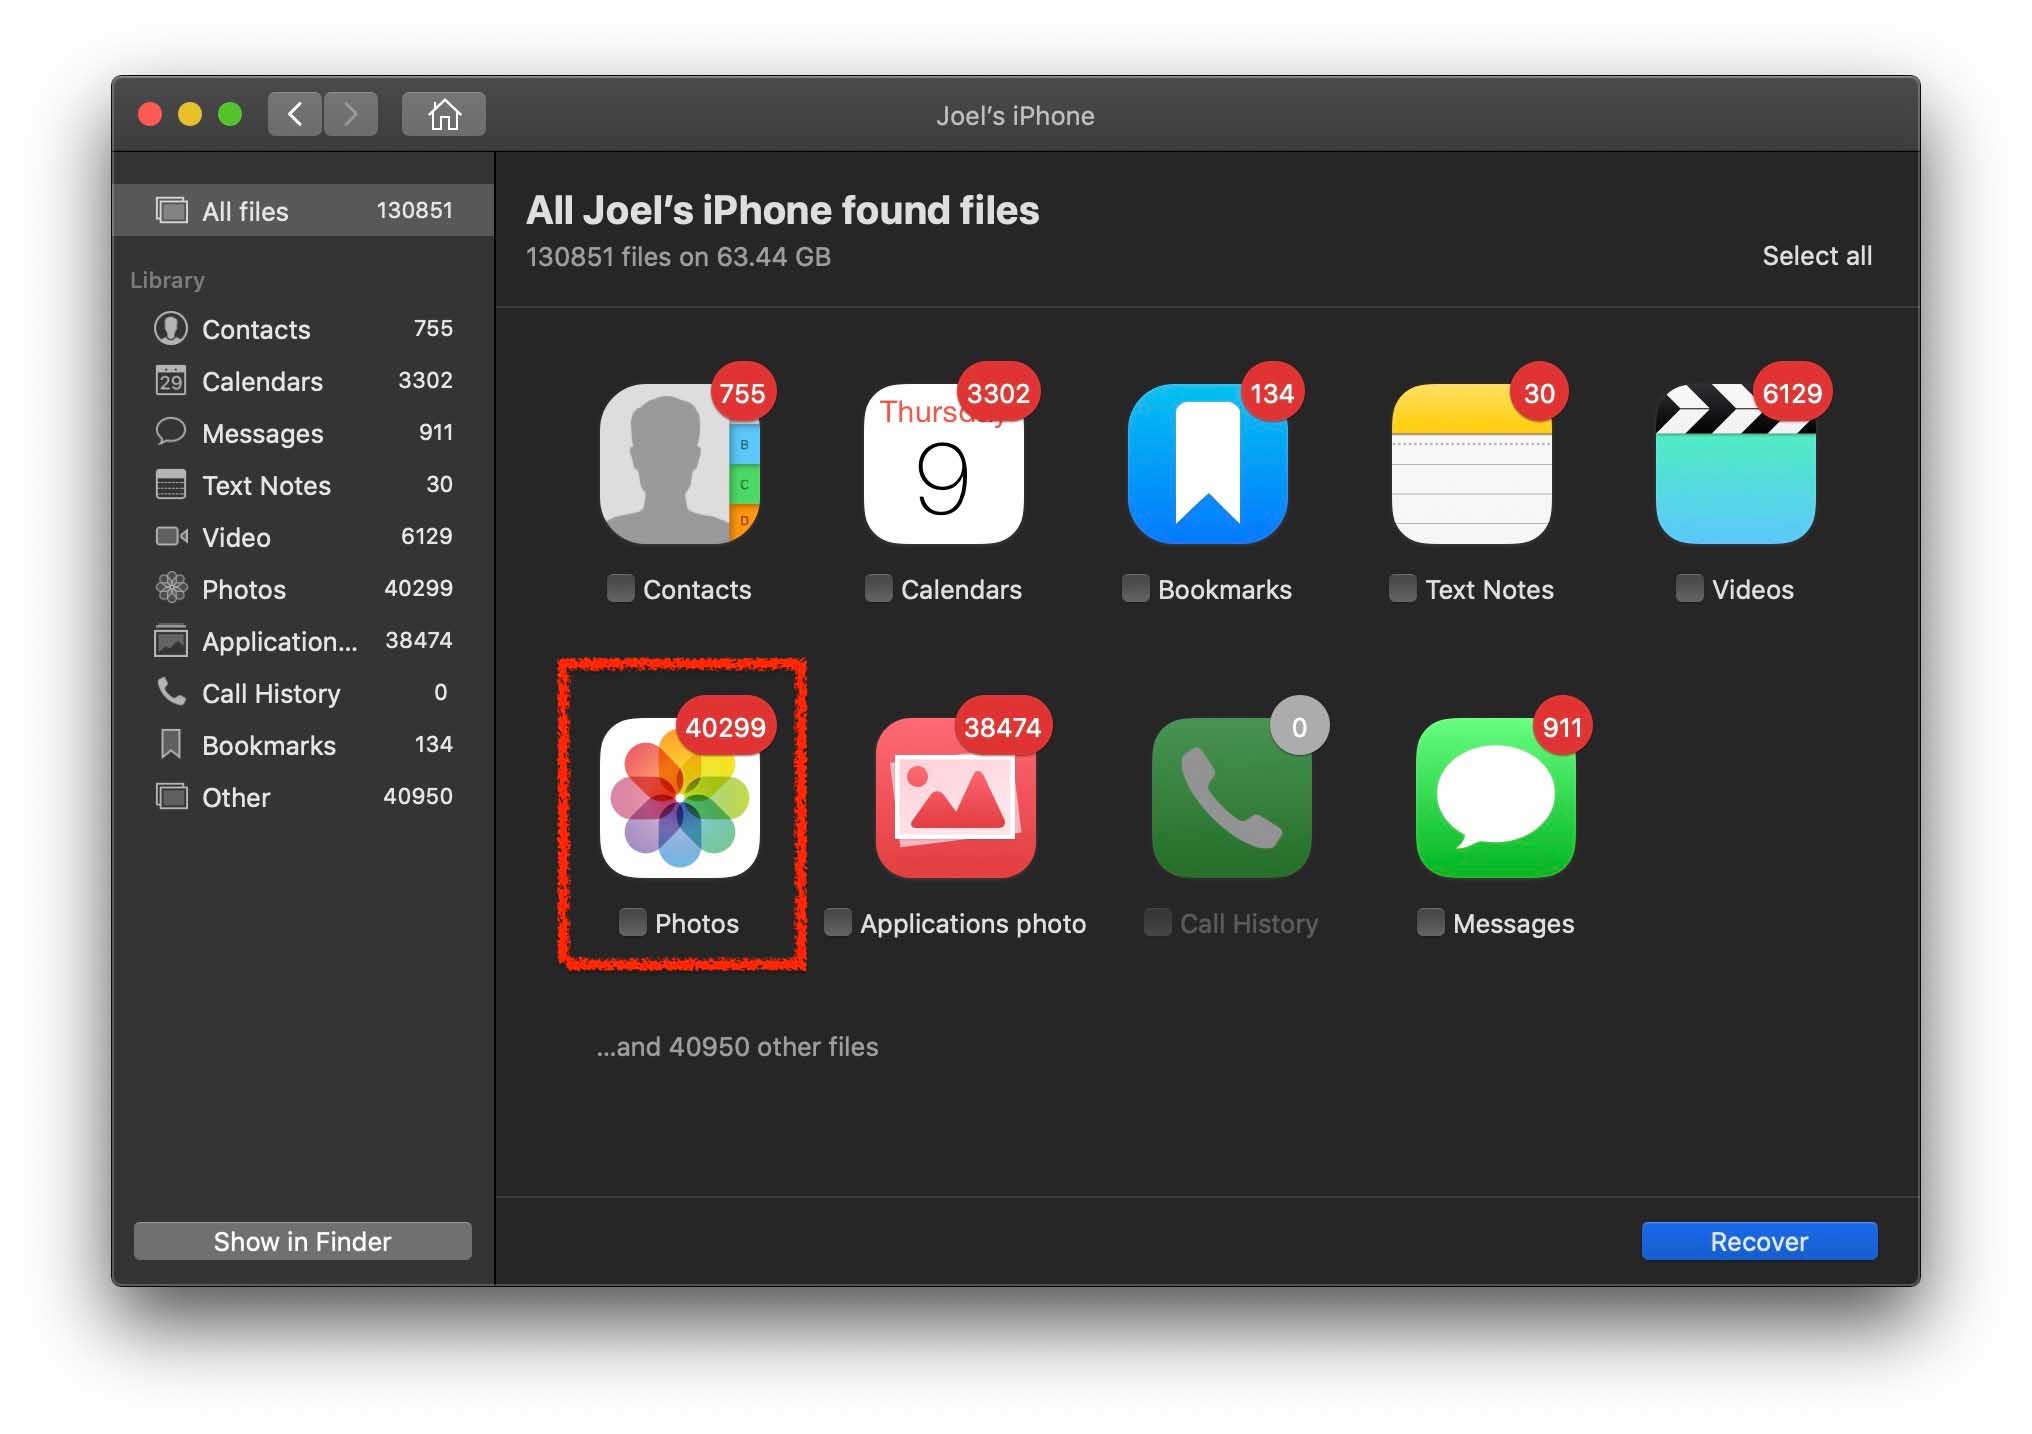
Step 4. After the scan has completed, you will be greeted by all of the found files on your iPhone. Click on the Photos icon to view the deleted photos that Disk Drill was able to recover. We're only looking at deleted photos in this example, but you can also retrieve lost contacts, calendar appointments, bookmarks, videos, and many other things.
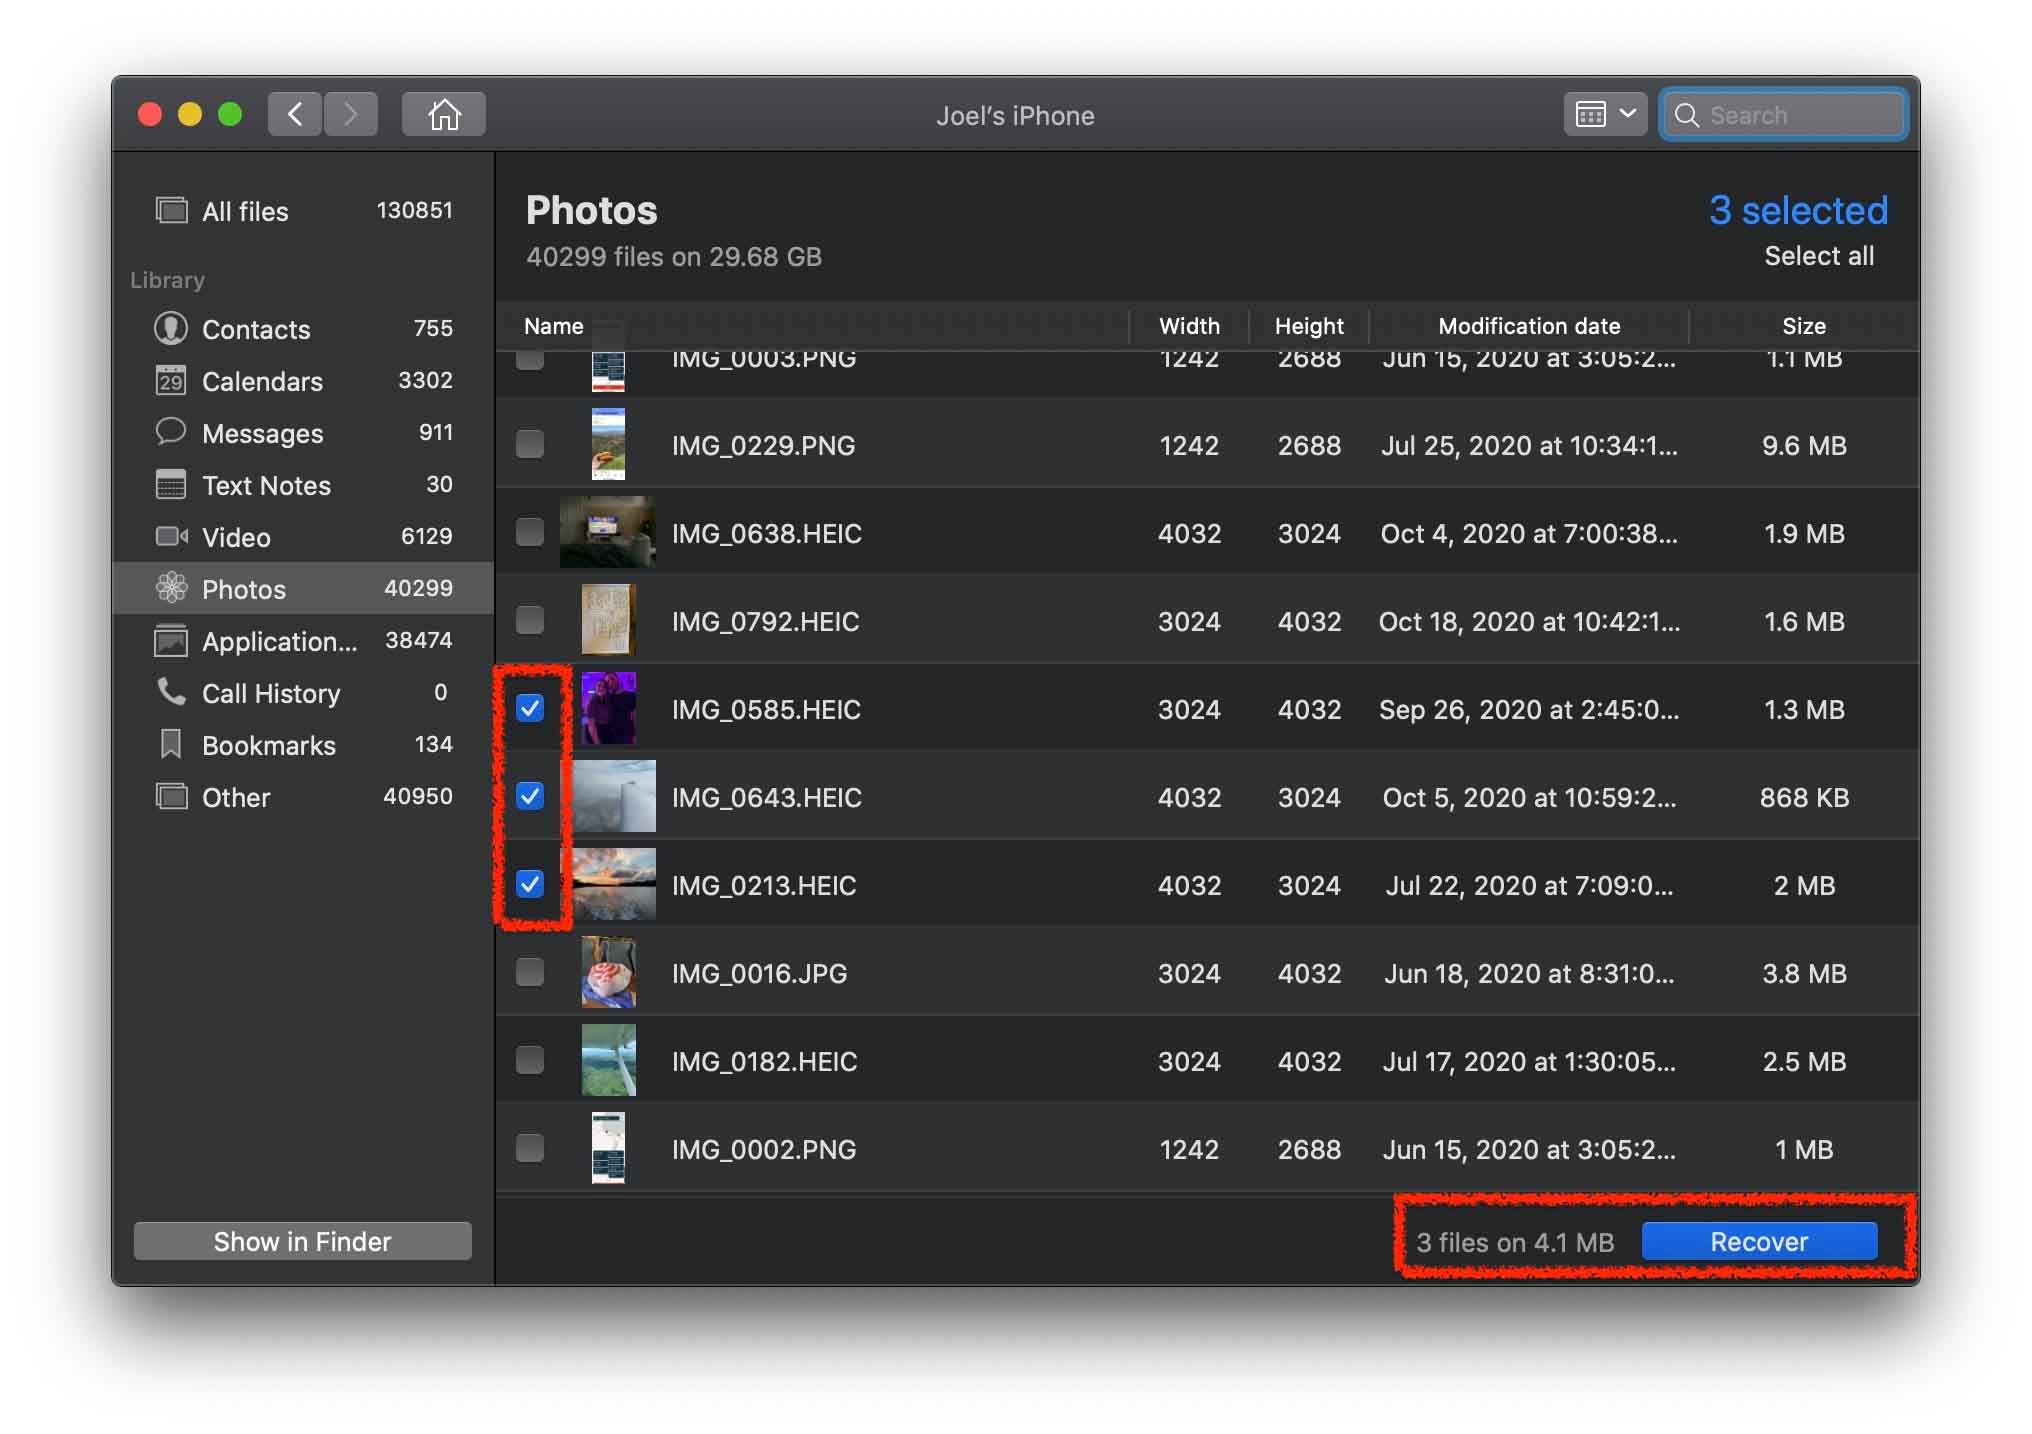
Step 5. Once on the recovered photos screen, we can find the deleted photos on iPhone. You can sort by name and date. Since all of my photos haven't been named and have the default file name, I am going to sort by the date that I want to recover my deleted photos from. You can search by photo name on your iPhone here if you do know the name of it.
Step 6. Select the photos that you would like to recover and then click the blue Recover button in the lower right-hand corner of the screen.
Step 7. Choose a path for Disk Drill to restore the deleted photos to and click OK.

Step 8. After you have successfully recovered the deleted photos, you will receive a confirmation message that the recovery is complete and the deleted photos will be restored to the location you choose on your computer.
Method 3: Restore your iPhone from a Backup from within the Music/iTunes App
If you plug your iPhone into your Mac or Windows machine and have the Music app or iTunes on your computer, then there is a chance that you might have set up your phone to backup to your computer. A computer backup is another way of recovering old photos and getting them back onto your iPhone.
The backup process happens automatically each time you plug your iPhone into your computer to charge. When plugged in, it also will sync and backup. On a Mac, this app comes installed as part of the operating system and is called the Music app. On Windows, you can download iTunes for free by going to Apple's website.
You can recover deleted iPhone photos from a backup on your computer using the Music app which is more current but if you're using an older version of macOS or Windows then iTunes will be the app to look for. The steps are pretty much the same in both, so the steps below can be followed no matter which you're using.
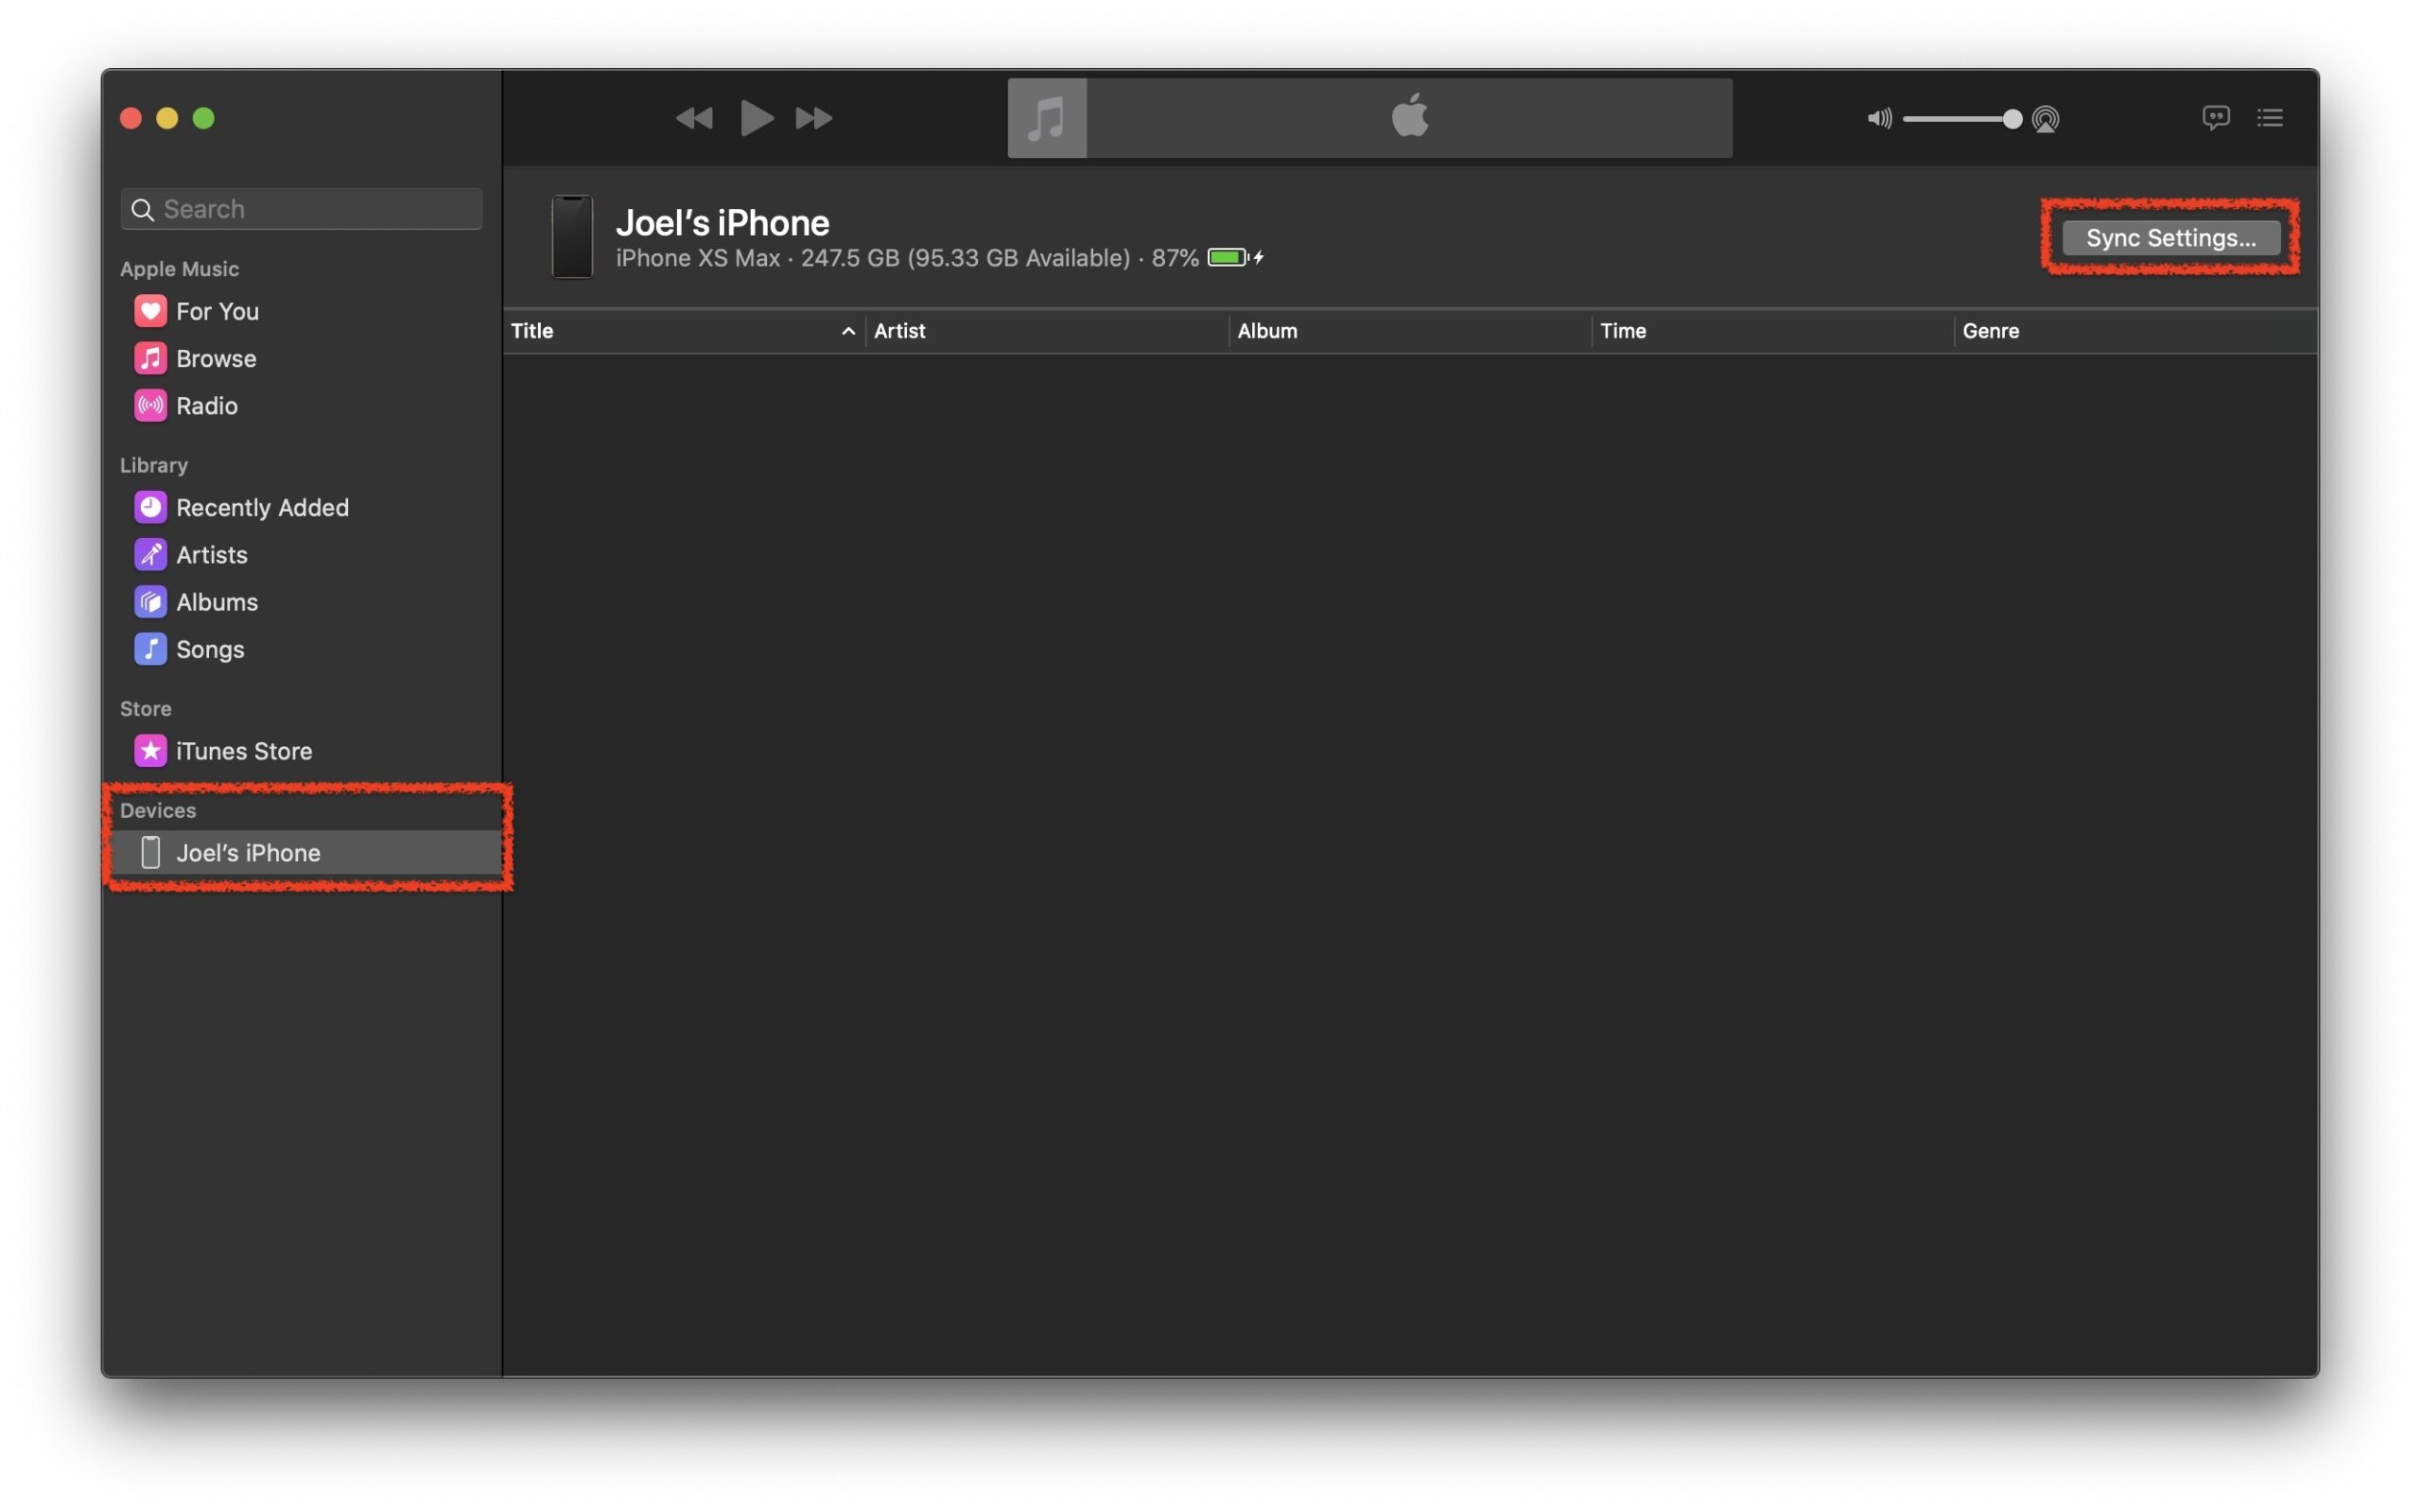
Step 1. Plug your iPhone into your Mac or Windows computer.
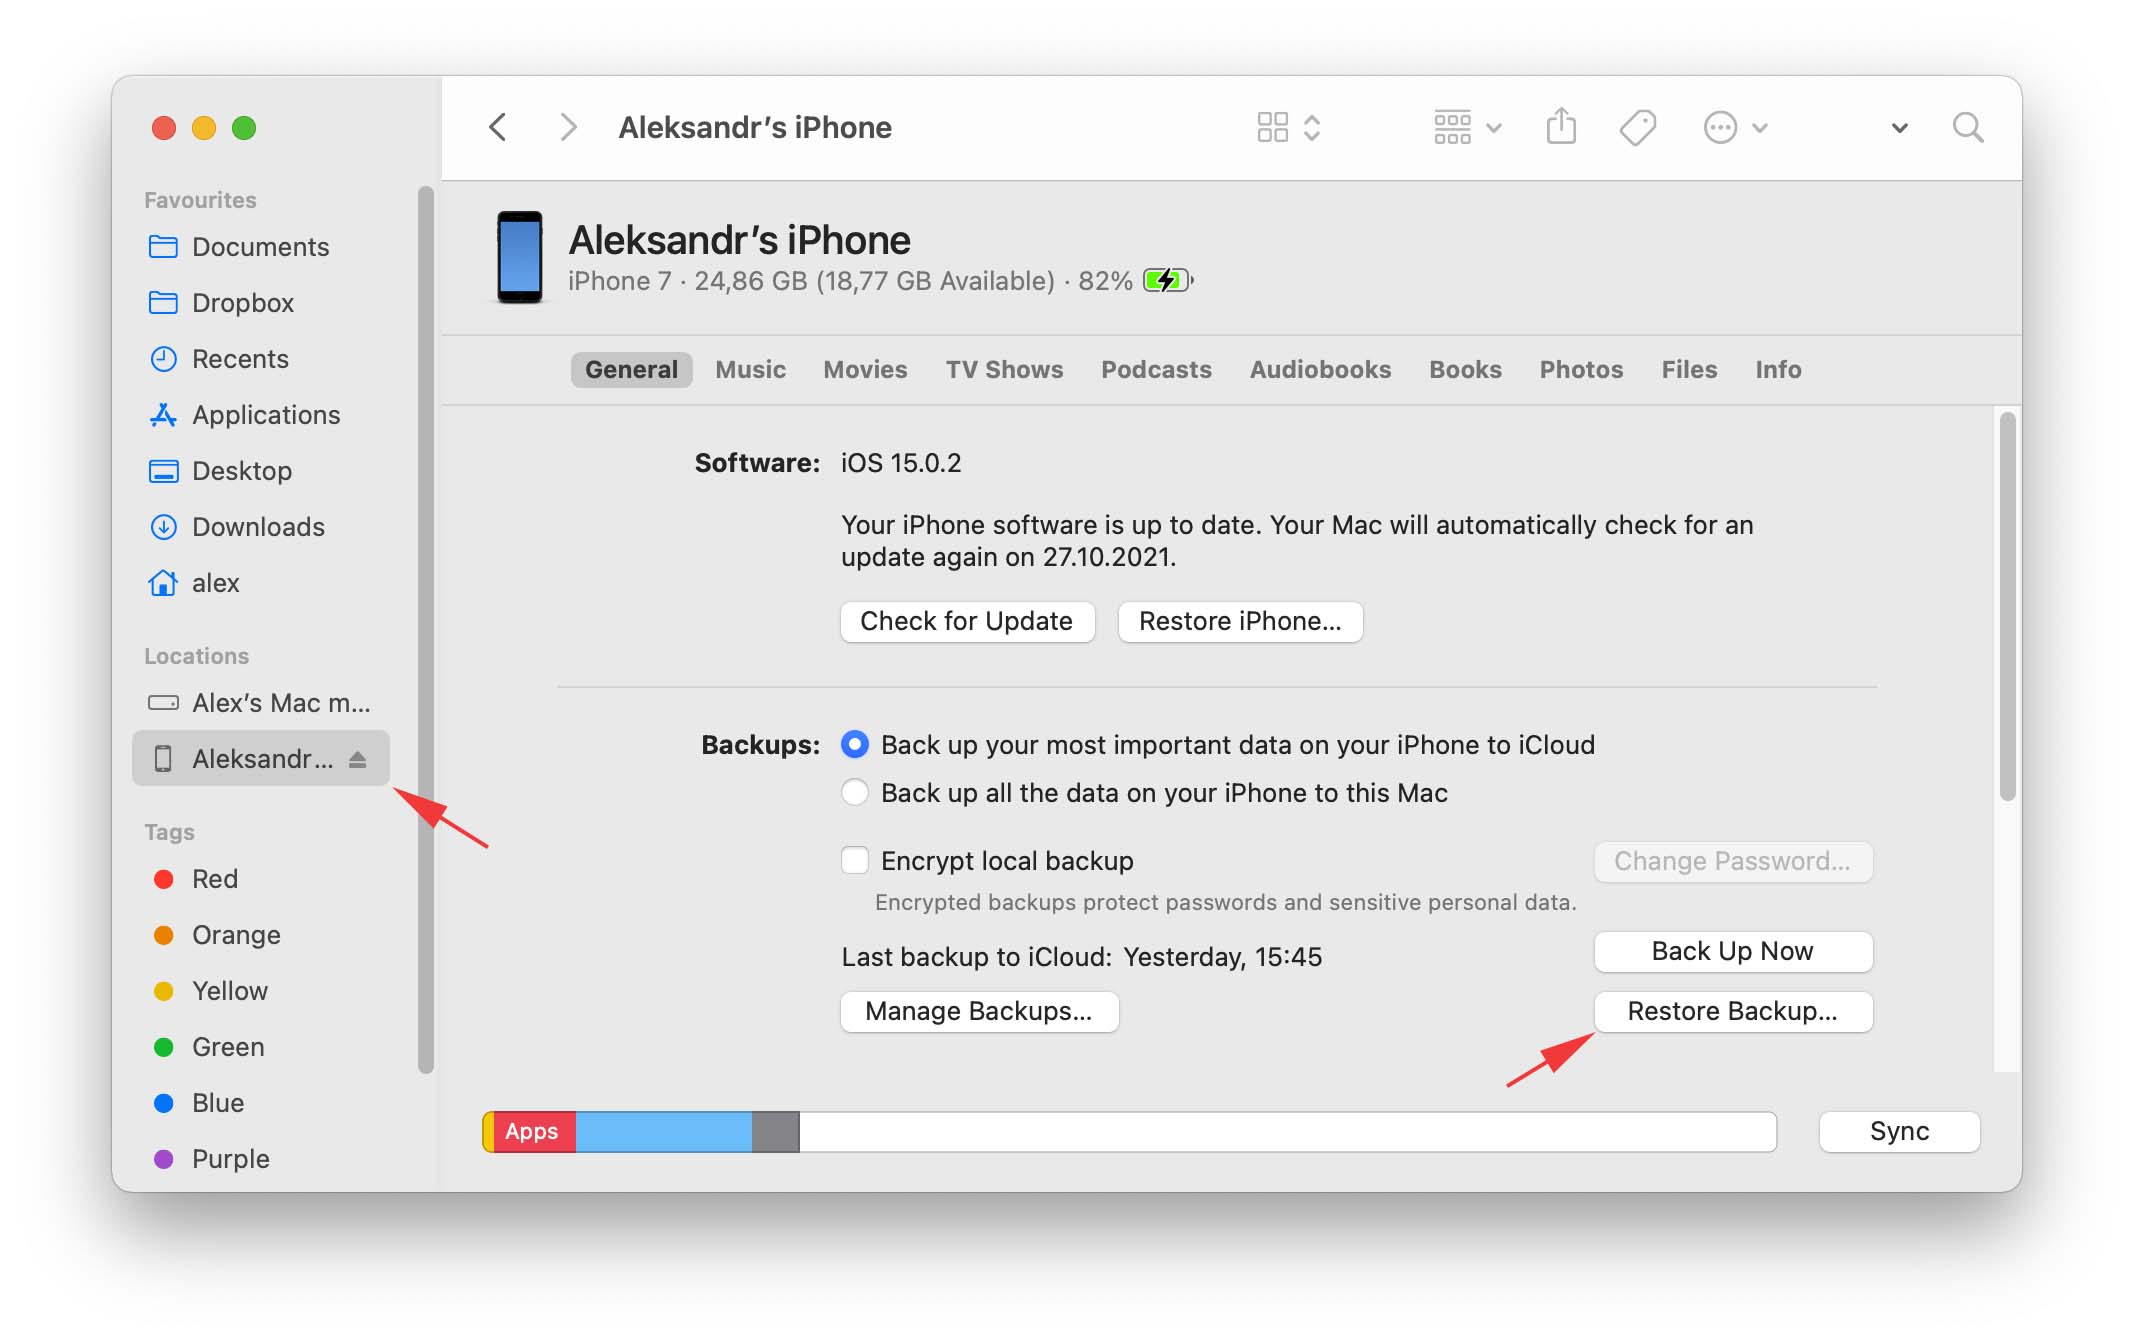
Step 2. Select your iPhone from the drop-down menu on the left-hand side and then click on "Sync Settings…".
Step 3. Once on the Summary page, select "Restore Backup…". This can be found from within the General tab. You can also manage backups and backup your iPhone from within this window as well.
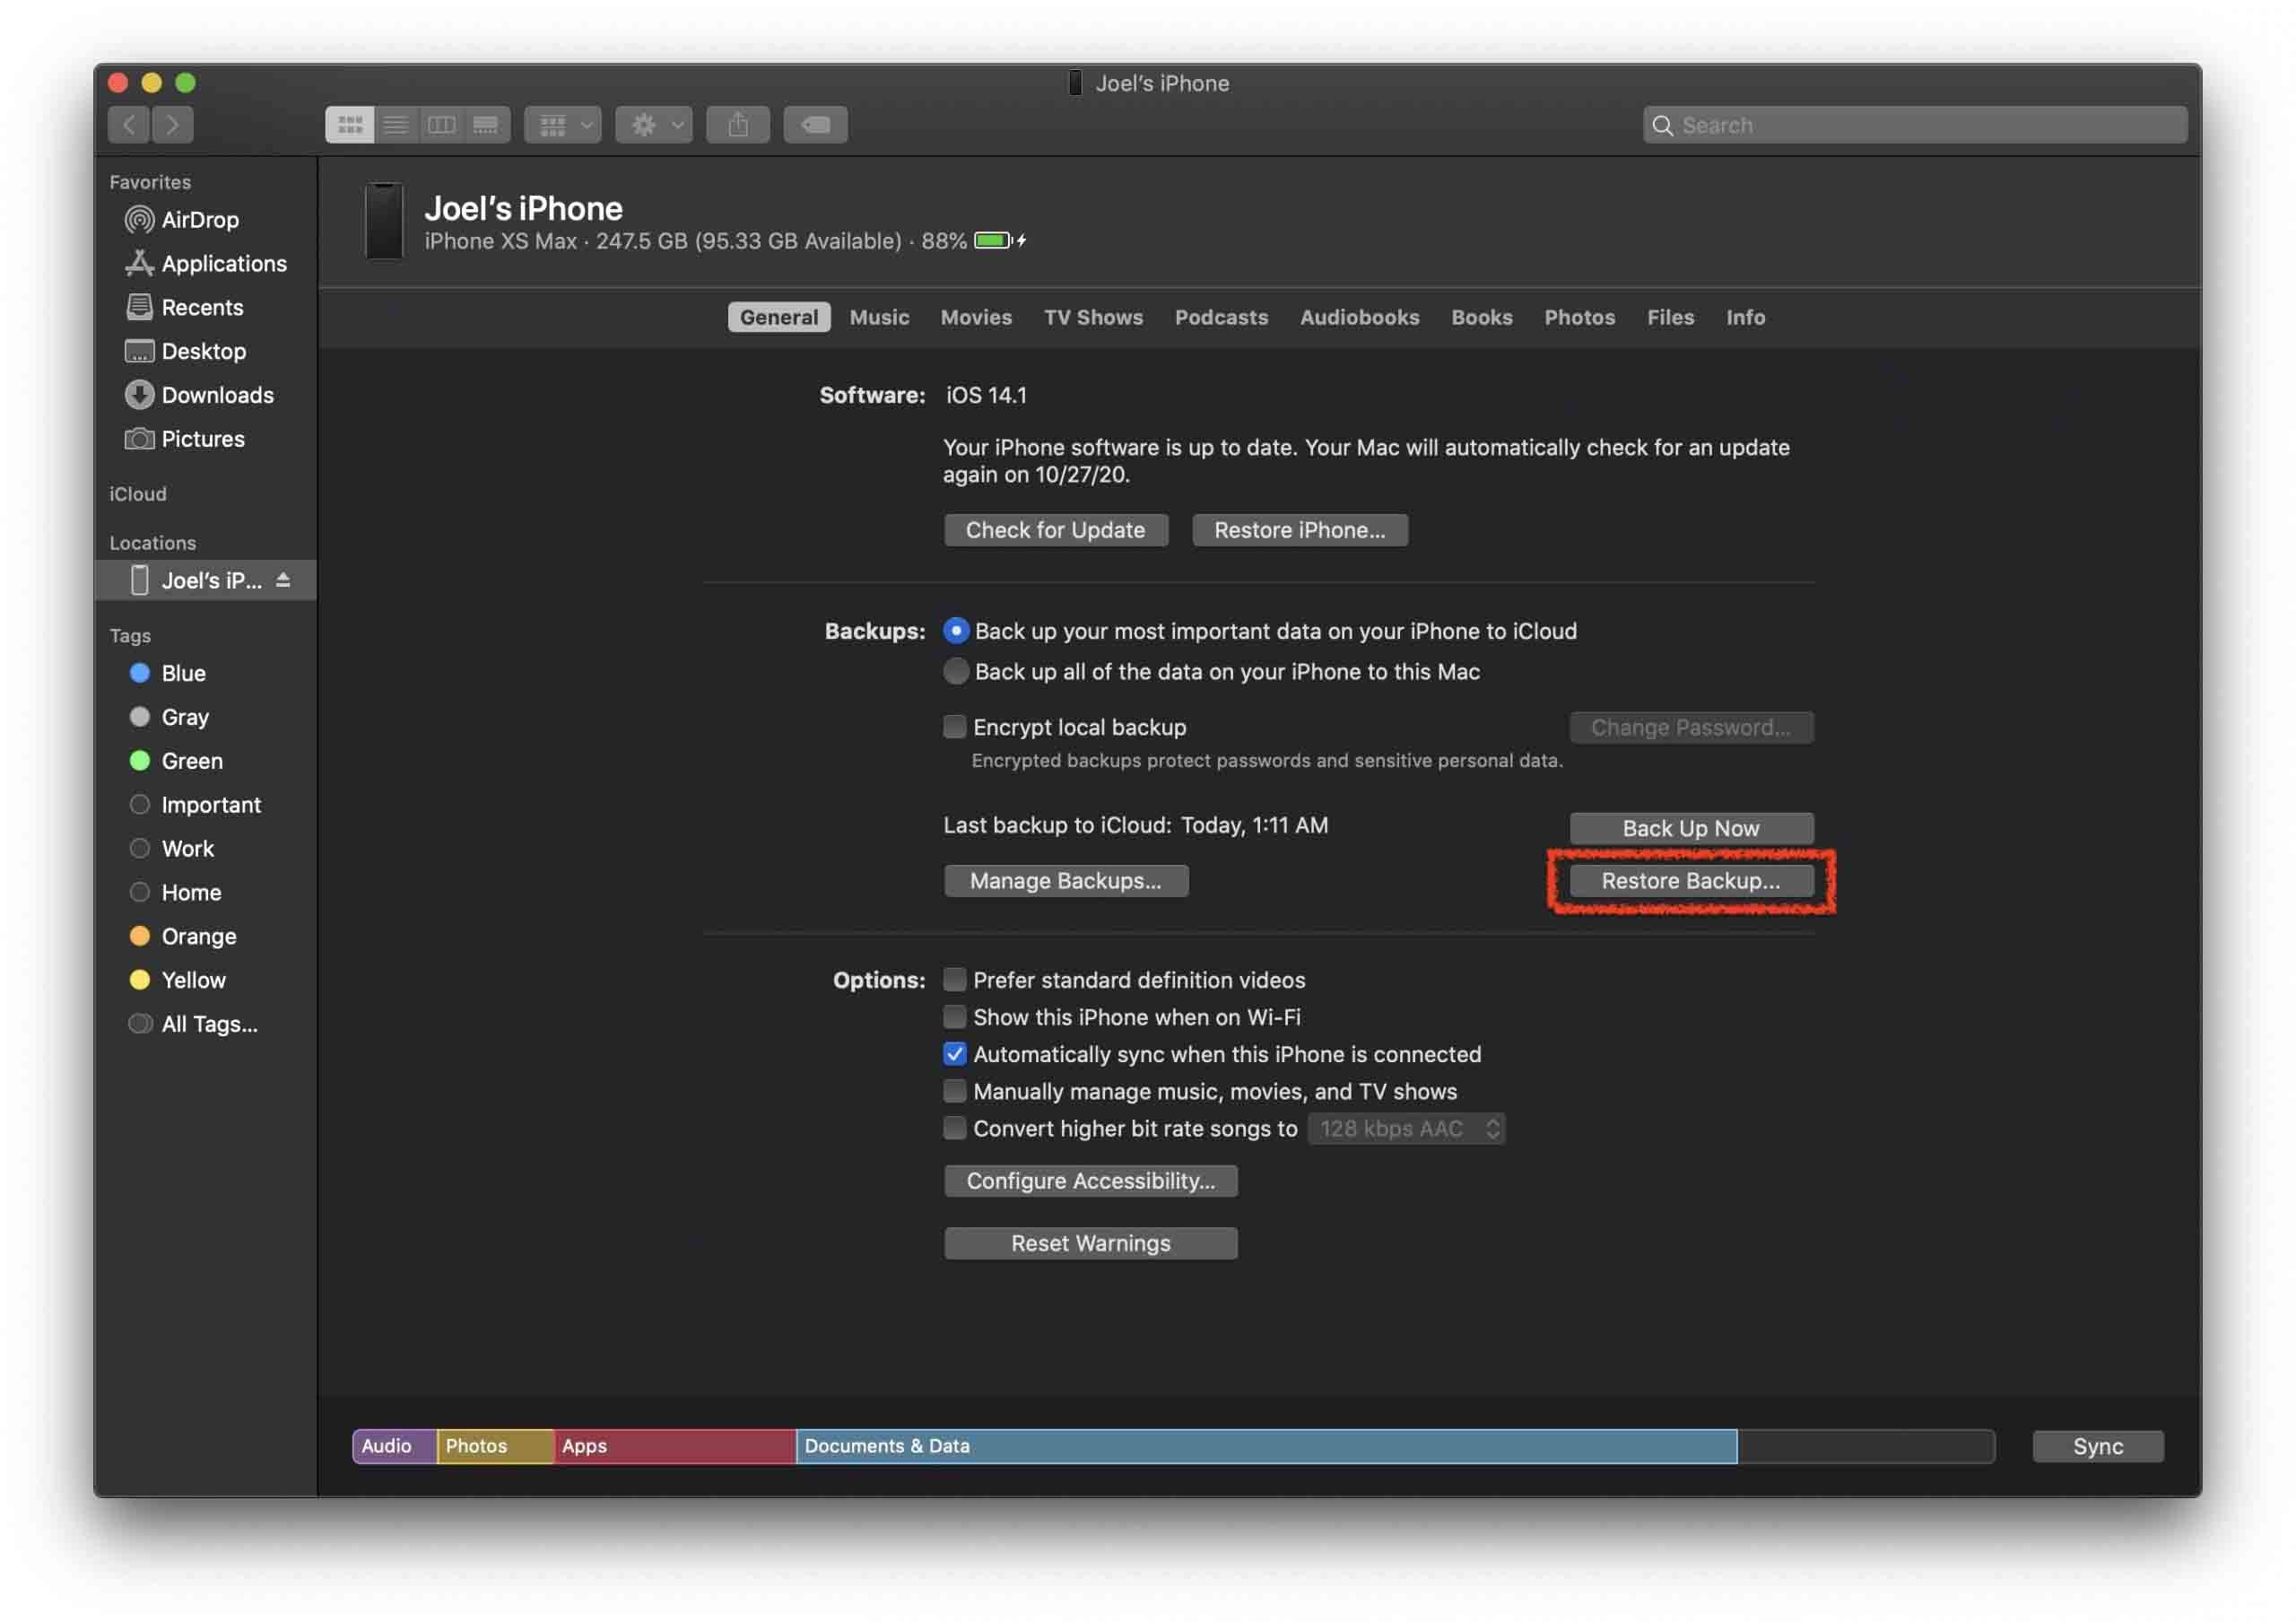
Step 4. After clicking the Restore Backup… option, your iPhone will restore back to the backup that you selected and your recently deleted photos will go back onto your iPhone. This will take some time depending on the size of the backup. Make sure your iPhone is plugged into your computer during this whole process as it can't be interrupted!
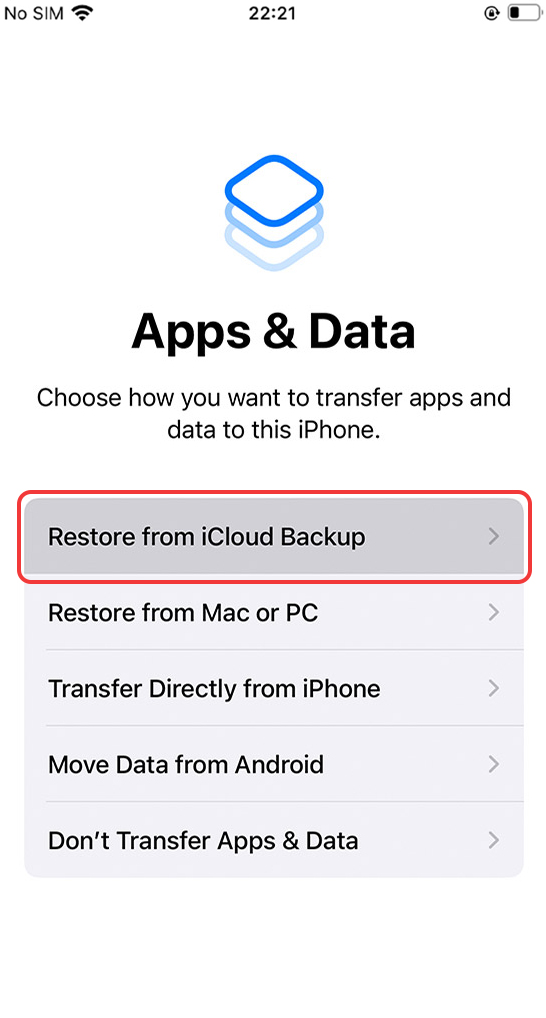
Method 4: Restore your iPhone to an Earlier iCloud Backup
When you purchase an iPhone, it asks you to set up iCloud during the initial set up so the chances are you may have enabled this without even knowing what it was as iCloud is one of the most used cloud services in the world. If you're wondering how to recover permanently deleted photos on iPhone, this is the way to do it if they're not in the Recently Deleted folder.
iCloud will sync your data between devices but it also will make a backup of your iPhone overnight when you plug it in to charge and it's on Wi-Fi. This is a backup of everything from text messages to contacts, and all of your pictures. Super useful and you don't even have to think about backing up your phone and it allows you to restore photos from an iPhone backup.
You can restore accidentally deleted photos from iCloud using one of the backups that have been created and put the data right back onto your phone. If you're wondering, "Does restoring iPhone delete photos?" then you should know that it will erase your iPhone at the current state it is in, but we will back it up to ensure that we can preserve them should the older backup not have the ones that we want.
Step 1. First, we want to back up our device should anything happen to it during the restoration process. To do that, plug your iPhone into a computer and back it up to the Music app if you're on a Mac or iTunes if you're on Windows.
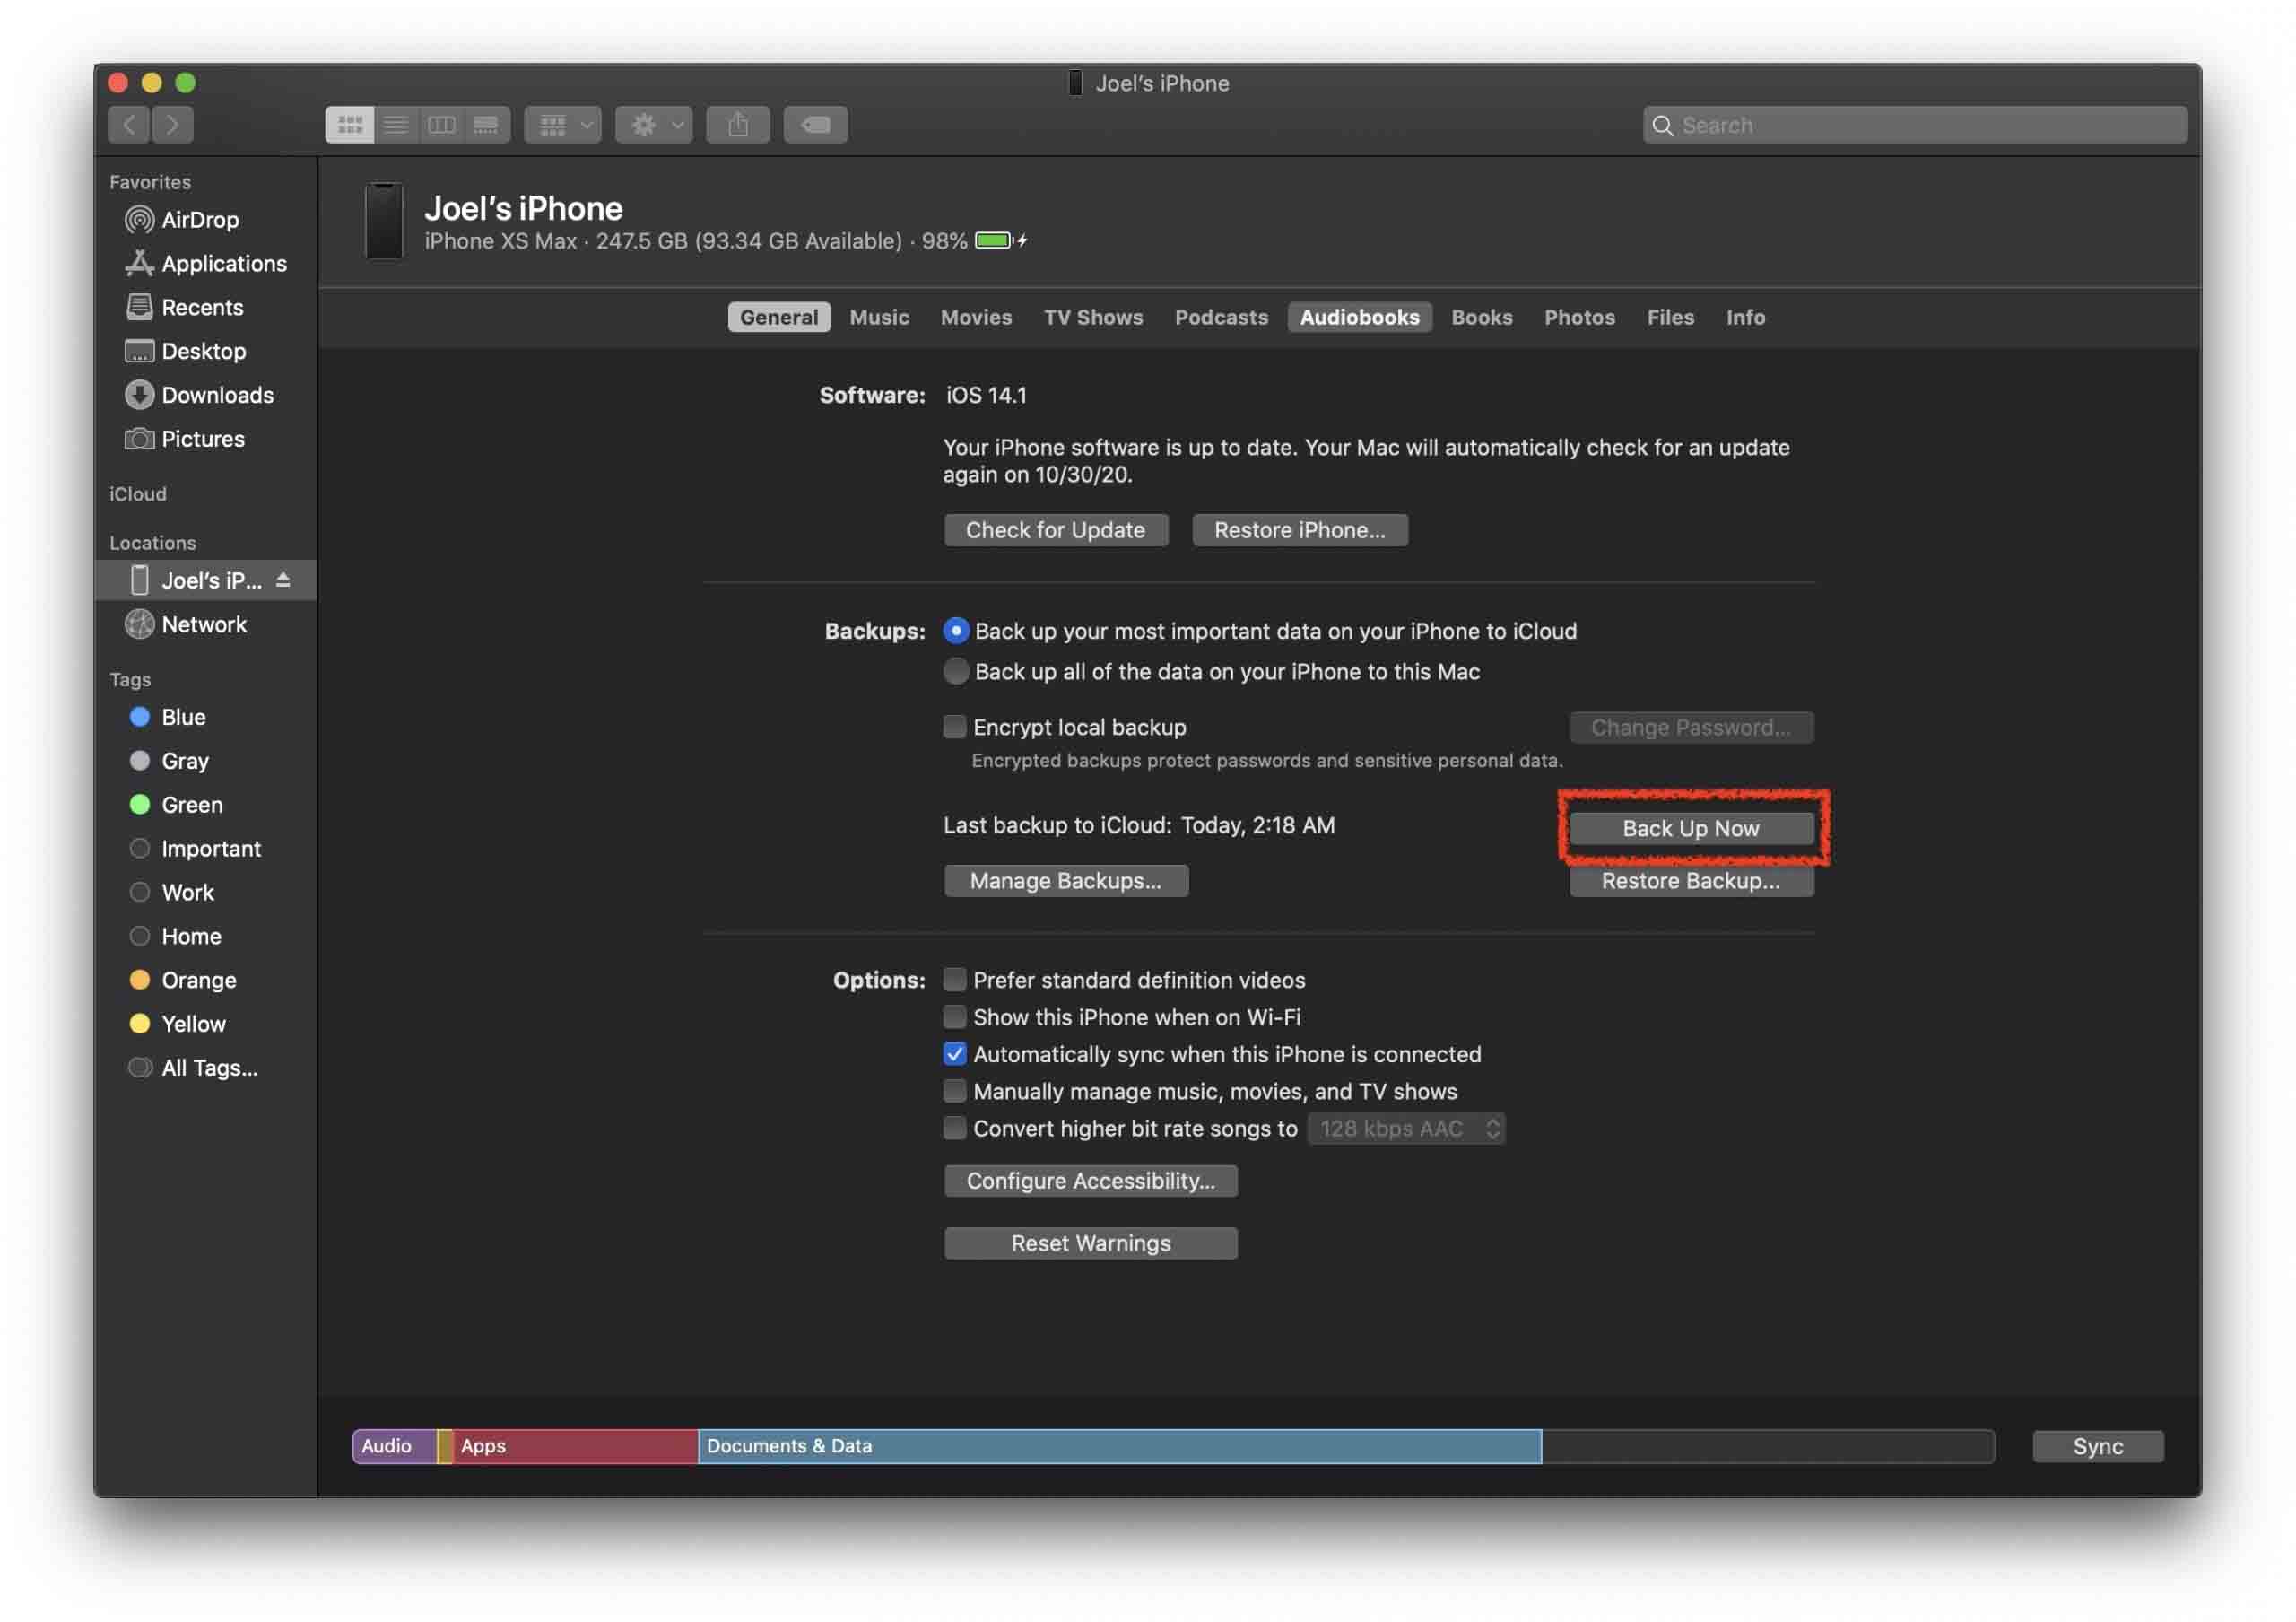
Step 2. Once in the Music app or iTunes, choose "Sync Settings…".

Step 3. Choose Back Up Now… to start backing up your iPhone to your computer. This may take some time and the phone will need to be plugged for the entire process.
Step 4. Next, we need to perform a factory reset on our iPhone so that we can go through the setup process which allows us to recover photos from an iPhone backup. To initiate the reset, go toSettings > General > Reset > Erase All Content and Settings.

Step 5. When your iPhone restarts, go through the iPhone setup process andchoose Restore from an iCloud backup and choose an older date from when you can last remember having the old photos on your iPhone. This will start the process of restoring photos from an iPhone backup.
Step 6. Wait for the restore to finish and then check your Photos app to see if the deleted photos have been recovered.
Note: if you have a lot of photos on your phone, then the restore can take a couple of hours depending on your internet speed so they may not show up right away. Give it some time to complete the backup and check and see if you can view the deleted photos in your Photos app.
The more photos that you take, the more storage you're going to need for your backups. If you're receiving messages that you don't have enough storage, upgrading is a very good idea. Your phone will pop up a message letting you know that you don't have enough storage available. Storage is also very cheap as it costs only $0.99 for 50GB per month up from the free 5GB that Apple gives you and is well worth the investment as it will ensure that you can bring back deleted photos on iPhone.
Method 5: Recover Your iPhone from a Local Backup
Creating iPhone backups is a quick and easy way how you can prevent data loss in the event of an accidental deletion or even a physical device loss, and it's also a great way to recover deleted photos from iPhone should a data loss incident really occur. On Macs running macOS Catalina and newer, iPhone backups are created using Finder, and Finder is also used to recover from previously created backups:
- Using a suitable USB cable, connect your iPhone to your Mac.
- Launch Finder and select your iPhone from the list of available locations in the left pane.
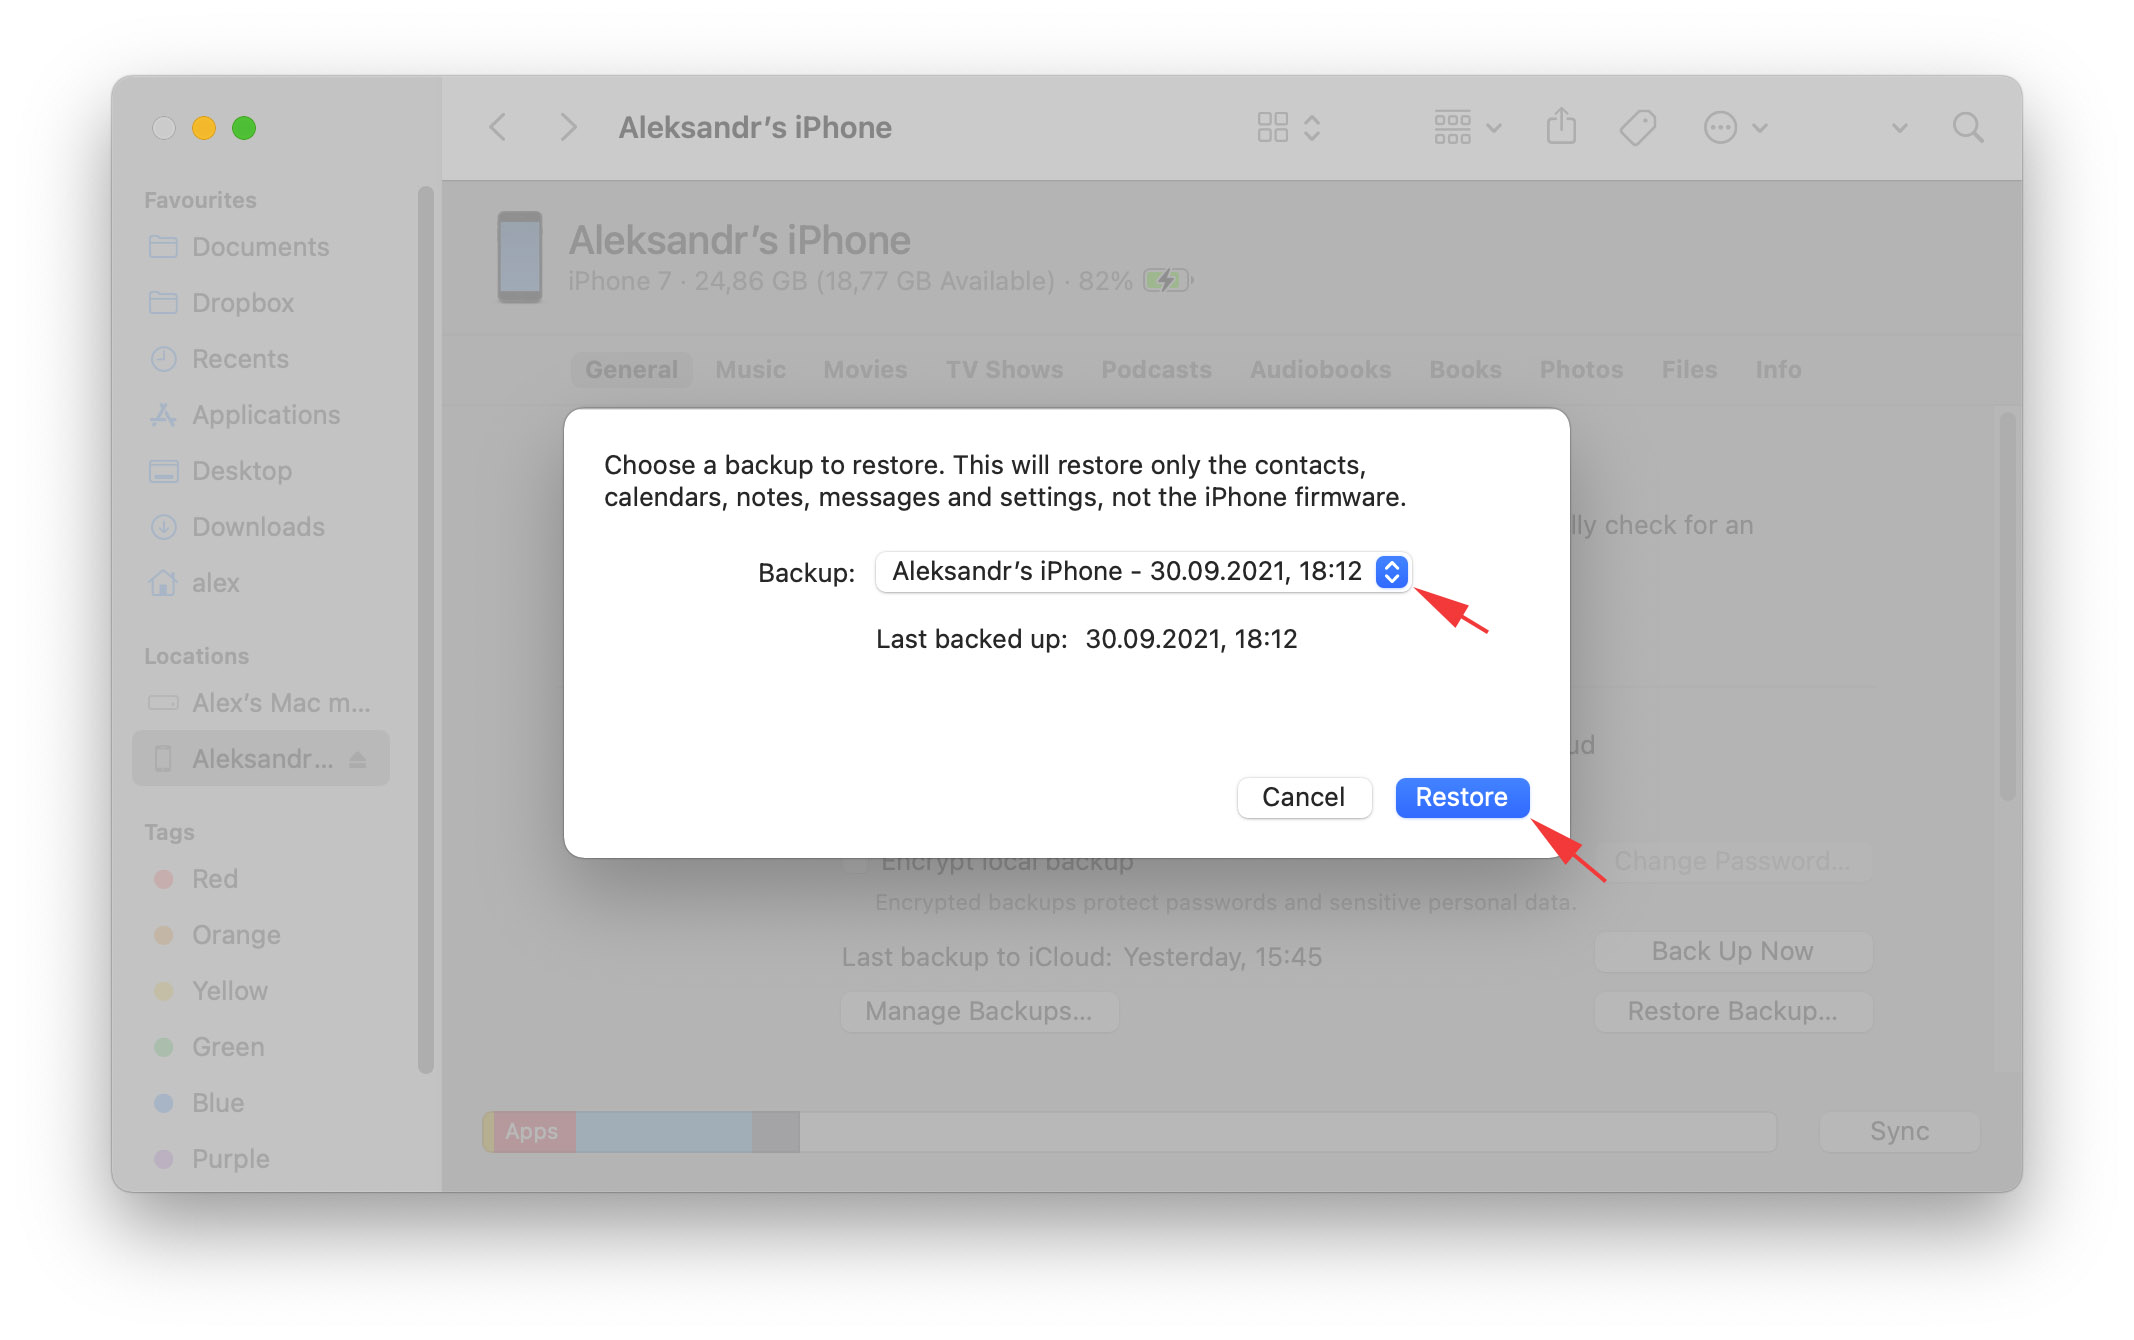
- Make sure that you're in the General tab and click the Restore Backup button under Backups.
- Select the most recent backup that contains your photos.
- Click Restore to begin the recovery process. You may be asked to enter your password.
Method 6: Retrieve Individual Photos from a Third-Party Cloud Backup App
iPhone users can choose from many different third-party cloud backup apps with automatic upload functionality. Popular examples include OneDrive, Google Photos, Dropbox, and Mega. These apps make it easy to recover deleted pictures from any iPhone—not just the one on which they were stored originally. All third-party cloud backup apps work more or less the same, so we'll describe only one app, OneDrive, and you can then adapt the instructions to fit the app you're using:
- Launch the OneDrive app.
- Go to the Photos tab.
- Press and hold the first photo you want to recover and then tap each additional photo that you want to retrieve.
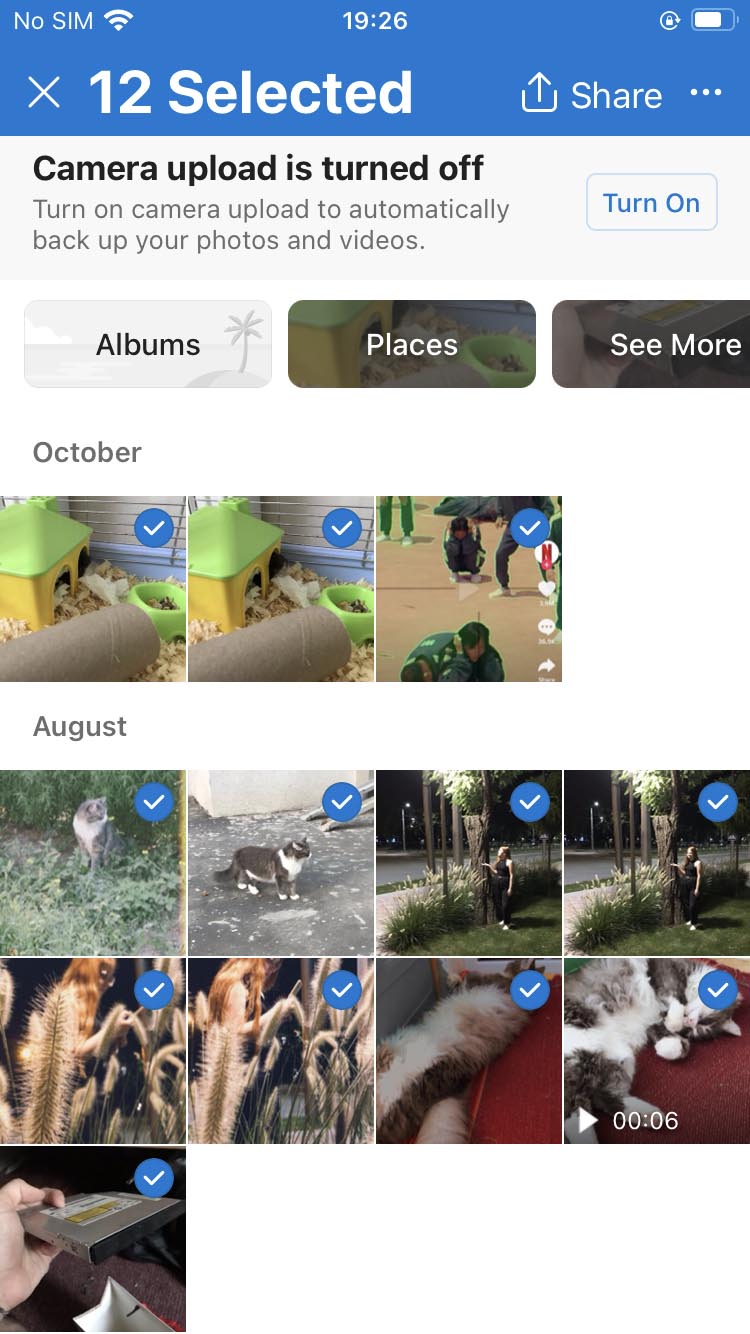
- Once you've made your selection, tap the Download icon to download the selected photos to your device.

You can also access photos backed up by OneDrive by signing in to the web interface, logging in with your email address and password, and going to the Photos tab. There, select all photos you want to restore and click the Download button.
Keeping photos stored only in OneDrive or other cloud backup service isn't nearly as dangerous as keeping important photos only on your iPhone, but having at least one local copy is recommended.
FAQ
Whenever you accidentally delete the wrong photo on your iPhone, you should first look for it in the Recently Deleted album. If it isn't there, then we recommend you scan your iPhone internal storage for lost data using data recovery software.
You can recover permanently deleted photos on iPhone 11 using data recovery software:
- Install data recovery software on your Mac.
- Connect your iPhone to your Mac.
- Scan the device and recover your photos.
There are multiple ways to retrieve pictures deleted from iPhone:
- The Recently Deleted album inside the Photos app.
- Third-party data recovery software.
- Local and cloud backups.
To restore iPhone photos from the gallery:
- Launch the Photos app.
- Go to Albums > Recently Deleted.
- Select the photos you want to recover and tap the Recover button to restore gallery photos.
Conclusion
Our iPhones are one of the best devices to take pictures with and they continue to get better each and every year. With the Recently Deleted folder, iCloud, and being able to backup to a computer there are multiple fail-safes put into place to help protect our photos from being lost should we accidentally delete them or should something happen to our device. Knowing where deleted photos go on iPhone and how to troubleshoot makes recovering pictures a much easier process. We can now undelete photos with ease and can rest easy.
Knowing how to use these services and tools will ensure that we don't have to have a catastrophic moment when we can't find the photos that matter the most to us.
How To Get To Deleted Photos Iphone
Source: https://www.macgasm.net/data-recovery/recover-deleted-photos-iphone/
Posted by: jenkinsneard1953.blogspot.com
0 Response to "How To Get To Deleted Photos Iphone"
Post a Comment